Welcome to our blog....here we will share all our afternoon tea adventures with you...the good, the bad and the wonderful!
Showing posts with label recipe. Show all posts

Saturday, 10 November 2018

Time for.....tea and biscuits....pretty biscuit recipes

Hello there,

Hope you're having a tea-riffic day wherever you are in the world!

Here at Tea With Me and Friends towers we've been baking biscuits. There is something about the colder days that sees me heading into the kitchen to whip up something sweet and scrummy! If you've stopped by our Facebook page recently you'll have seen what we've been up to, baking biscuits that taste scrummy and look really pretty too!

I've enjoyed my baking so much that I thought I would share one of the recipes that we've been working on. Inspired by one of my favourite retro puddings, I've been creating some black forest gateau biscuits combining scrummy chocolate and cherry flavours. I've had the pleasure of enjoying real black forest gateau in the Black Forest in Germany (its far from the frozen version of my childhood) and you can't beat the flavours!


The best thing about these scrummy biscuits is that they are really simple to make. The base is a light chocolate biscuit, topped with a layer of cherry preserve and decorated with a cherry flavoured butter cream. 

To make six biscuits you will need.....
125g softened butter
75g icing sugar
115g plain flour
40g cocoa powder

Your oven needs to be preheated to 160 degrees.


To make the biscuits, first beat the butter and icing sugar together until light and fluffy (using a large bowl helps with icing sugar spills). Then sift in the flour and cocoa powder and combine to make a dough. If you find the dough a bit sticky, add a little more flour.

Next roll our your dough out and cut out your desired shapes. I went for scalloped circles - each biscuit has a base and a top, the top has a small centre cut out to reveal the pink butter cream.

Your biscuits need to be baked in the preheated oven for approximately 15 minutes (during this time you kitchen will smell amazing!).


Once baked, transfer to a cooling rack and leave until cold before decorating......then you can get creative! I decided I wanted to combine preserve and flavoured butter cream to really add cherry flavour to the chocolate biscuits. 

On the base biscuit I first spread a thin layer of the cherry preserve across the whole biscuit (be careful doing this as the biscuit can be a little fragile), then I piped cherry flavoured butter cream on top - again cover the whole of the biscuit.


Next I added the top biscuit with the centre missing, adding some red and white sparkles to the centre for a little extra sparkle. Finally pipe some more buttercream around the top biscuit. 

I'm really pleased with how these biscuits turned out - a scrummy light chocolate base, topped with lashings of cherriness! Perfect with a good cup of tea on a cold afternoon!


Over the last couple of weeks I've also experimented with other flavours too, combining other fruit flavours with chocolate biscuits.

I've baked chocolate and orange fingers and chocolate and raspberry stars....


The stars were my favourites...the dark chocolate and tangy raspberry were a perfect match. They were so good that they vanished very quickly....in fact the photo above is the only one I have of the stars! 

I hope you've enjoyed this post - if you make the biscuits yourself we'd love to see the results!

Thank you for popping by today,
Rachel

Friday, 13 April 2018

Time for.....a tea recipe with T2

Hello there,

Welcome back to Tea With Me and Friends!

This week we've been experimenting with our cuppa thanks to a fab tea recipe card that I picked up in a T2 store. T2 like to share tea recipes, combining their teas with different foods and drinks. As well as the fab recipe cards in store, you can also find a whole host of easy to follow recipes on
their website - including tea-infused ice cream floats, earl grey cakes and matcha mayo!

The recipe card I picked up had three different recipes on which used a different T2 teas - Banoffee Pie, Jersey Caramel and NY Salted Caramel....great for someone like me with a sweet tooth! I opted to try the NY Salted Caramel recipe which features T2 New York Breakfast tea (a black tea blended with cinnamon and vanilla), along with salt, honey and milk.


This recipe is really quick to make and creates a really satisfying cuppa! All you need to do is brew the tea for approx. 4 minutes, then add the salt, honey and milk to taste.

I'm not going to lie - its a bit bizarre adding salt to a cup of tea, but you've just got to go with it. The recipe called for a pinch of salt, I probably didn't add quite a pinch - I'd definitely advise adding the salt and honey a little by little, tasting after each addition. I then added a splash of milk, which made the tea quite creamy and made it look almost like a hot chocolate!


I really enjoyed this tea - once I got the balance of salt and honey right it tasted lovely. It's hard to describe, but it almost felt like I was actually drinking/eating pudding - it would be perfect after a meal when I have a craving for something sweet. 

I'll definitely be trying some of the other recipes on the T2 website and keeping my eyes peeled for more recipe cards!

Have you tried any of the T2 recipes? We'd love to hear which is your favourite!

Thanks for popping by today,
Rachel & Lorna

Saturday, 17 February 2018

It's Cocktail Time - featuring Rutland Tea Co

Hello there,

Welcome back to Tea With Me and Friends - we hope you're feeling tea-riffic today!

Regular visitors to the blog will know that we love a good cup of tea with our afternoon tea or maybe a glass or two of bubbles....but we also love a great cocktail! We think there is nothing better than a well made cocktail to tickle the taste buds!

Recently I've been experimenting with some tea in my homemade cocktails and I wanted to share this one as I am so pleased with how it turned out! 


This is a sweet and fruity cocktail, probably slightly better suited to the summer months....but I can't see the problem with being prepared for the warmer weather! I can just see myself in the garden with a glass of this on a summer's evening. The flavours are tropical - think oranges and pineapple and you're on the right lines!

For this cocktail I have used the wonderful Earl Grey Blue Rose tea from Nottingham based Rutland Tea Co. This is a scrummy tea whether you enjoy it hot or cold. Its a traditional Earl Grey with citrus flavours which has been super charged with pineapple-peach flavours. The flavours are tropical, but remain light and refreshing. 

I discovered this tea as part of a Tea Tourist monthly subscription box, but you can also buy this tea directly from the Rutland Tea Co.

For this cocktail you'll need to brew the tea in advance and then leave it to go cold.


I have used Orange Marmalade vodka from Chase Distillery, as this is my preferred citrus vodka. You can substitute this for another brand if you have a favourite. I also used a sugar syrup - I was lazy and used a shop bought version. If you're feeling in the mood or don't have any pre-made you can easily whip up a batch of sugar syrup at home...

Homemade sugar syrup
In a saucepan over medium-high heat, bring cold water and sugar to a boil.
Turn the heat low and constantly stir the mixture until all the sugar dissolves and the mixture is clear, this will take approximately 3 to 5 minutes.
Leave to cool

Finally I have topped my cocktail off with a little Prosecco - I can't remember which brand I used....you can use whatever you happen to have at home or your favourite brand. 

Now the important bit....

To make the cocktail
This is really simple....no shakers or mixologist skills required!

In a glass (I used a wine glass) with ice combine:
100ml of the cold tea
25-50ml of sugar syrup - I recommend putting a little in and tasting it for sweetness
50ml of citrus vodka
then top it off with a little Prosecco

Et Voila....you've got a glass of sunshine to enjoy! 


I topped mine off with a slice of orange (it was a clementine to be precise) but I was just trying to be fancy! If you have no fruit to hand, don't worry!

Have you used tea in your cocktails at home? Do you have a favourite recipe? I'd love to hear about it and maybe give it a try myself - get in touch and let m know!

Thank you for popping by today,
Rachel 

Friday, 9 September 2016

Time for....a scrummy biscuit recipe!

Hello there,

Welcome back to Tea With Me and Friends - today we have a slightly different Friday blog post for you...we have a new recipe to share with you!

This week I hosted the first papercraft sub group for the local WI where I am Vice President. We set up Bake, Natter and Roll (Farnham WI) at the beginning of the year and we currently have 80 members. Being a crafty individual, I was happy to host the group when it was suggested.....but of course I felt as well as a craft I needed some baked goodies to offer the lovely ladies.

I got my timings slightly wrong on the day on the meeting (getting stuck in the office longer than I had planned) and so didn't really have time for any elaborate baking....so I decided biscuits were the answer....

Oaty chcolate chip cookies from Tea With Me and Friends!

I found a recipe I liked the sound of in one of the million baking books I own....and then in typical Rachel style I changed it!

These little delights are sweet and oaty, sightly chewy in the middle but also lovely and crunchy! Perfect with a cup of tea (or coffee) when you are crafting....or at any time really!


Even better....they are so simple to make!

To bake these you will need:

175g / 6oz - rolled oats (I used large rolled oats as they had been on offer in the local supermarket)
75 g / 3oz brown sugar
1 egg
60ml / 4tbsp sunflower or vegetable oil
a handful of chocolate chips (because that's what I had in my cupboard!)

What to do....
  1. Preheat your oven to 190c / 375f
  2. In a bowl combine all the ingredients, making sure there are no lumps of sugar
  3. Spoon small heaps of the mixture onto prepared baking sheets - allowing a little room between each heap for spreading
  4. Press the heaps into small, flat circles (although you'll notice mine were more wonky shapes than circles!) with the back of a fork
  5. Bake the cookies for about 12 minutes, until golden brown
  6. When cooled slightly, transfer the cookies to a wire rack
  7. Enjoy!

You can use as many chocolate chips as you like - I think I would have preferred a few more in my cookies. The ladies of the papercraft group also commented that these would be good with a handful of peanuts thrown in as well.


These were so popular that between the papercraft ladies and Joe, there was only one cookie left the morning after they were baked! I can confirm that it tasted just as good the next day!

I hope you like this quick and simple recipe - if you give it a go at home I'd love to hear what you thought!

Thank you for popping by today,
Rachel

Wednesday, 6 April 2016

Time for....some baking...this time with Twinnings!

Hello there,

Welcome back to Tea With Me and Friends - we hope you're keeping well today.

Remember last week when I shared that scrummy Piacha Black and Cherry biscuit recipe and I mentioned that you could probably use any tea in this recipe....well guess what....I've been back in the kitchen experimenting again! And I can confirm that this recipe works well with other teas too!

Twinings Lady Grey teabag biscuits
from Tea With Me and Friends

This time I have used Lady Grey tea from Twinings. 

If you haven't tried Lady Grey yet, it's a black tea combined with oranges and lemons to give a fresh and zesty tea. For this recipe I have used a Twinings teabag, and I found that the leaves were the perfect consistency for the biscuits.

Apart from a different tea, the recipe for these biscuits is exactly the same as before.....


You will need:
1 Twinings Lady Grey tea bag
130g plain flour
50g caster sugar
20g icing sugar
100g unsalted butter
splash of water
100g chocolate - optional

A straw for poking holes
Bakers twine (or other thread)

This will make: 16 teabag biscuits

Preheat your oven to:
200c or 180c (fan oven)

To make the biscuits:

  • No need to grind your leaves this time - just tear open the teabag!
We flavoured our biscuits with a Lady Grey teabag
  • Combine all your dry items (so that's the tea leaves, flour and both sugars) in a bowl, mixing them well
  • Next you need to add the butter - rub this into your dry ingredients so you end up with a bread crumb like mixture. Don't worry if it starts to combine together at this stage,
  • Now add a splash of water and carrying on combining the mixture to make a dough. At this stage less is definitely more - you don't want a sloppy dough
  • It's time to chill your mixture - this is important to stop the dough expanding when baking in the oven. Roll your dough out, wrap in cling film and put in the fridge for at least 30 minutes.

  • Once chilled, we get to the fun part - making the teabags! First put flour on your clean work surface, then roll out the dough until its about 0.5cm and then cut out your little teabag shapes. I used a straw to make the hole at the top of each teabag.
  • Once you've cut all your teabags, place them onto a cold baking tray and place in your preheated oven for 12 minutes or until the edges of your biscuits turn a golden colour.
  • Remove your biscuits from the oven and allow to cool
  • Once cool you can thread your twine through the holes in the top and dip your biscuits in melted chocolate. Don't forget if you go down the chocolate route you'll need to leave the biscuits to dry before you can tuck in.
  • Enjoy with a cup of tea!
Twinings Lady Grey teabag biscuits

These biscuits are crisp, light and fruity - the zesty flavour really comes through well. Again, you don't really need the optional chocolate, but the teabags look cute if you use it.

We hope you've enjoyed our second recipe for teabag biscuits - if you give this recipe a go we'd love to see the results!

Thank you for popping by today,
Rachel


Thursday, 31 March 2016

Time for....some tea inspired baking with Piacha tea

Hello there,

Welcome back to Tea With Me and Friends - we hope you're having a tea-riffic day.

Today I am sharing with you a little recipe that made me very happy. You may remember that we discovered the fabulous tea from Piacha a while ago - Pia has so many delicious blends on offer, but Black and Cherry is one of my favourites. It's a sweet tea, that I find very refreshing. For ages now I have been trying to include this tea in my baking - always focusing on cakes. But they always fail - with hardly any flavour carrying through to the cake.

Tonight however I decided to try something different - I had seen teabag shaped biscuits all over the Internet (Ok - mainly on Pintrest....the place I seem to spend most of my time!!) and it struck me that maybe I could include Black and Cherry in a biscuit. A lot of the teabag biscuits I came across were flavoured with green tea (often using Matcha powder) but then I came across a couple of recipes which included earl grey tea. After doing a bit of research about whether you can actually eat tea leaves, I decided to give it a go and worked on a recipe using the Black and Cherry tea leaves.....and I'm so glad I did....

Black and Cherry tea bag biscuits
from Tea With Me and Friends
These biscuits are light and crisp and have a beautiful cherry flavour that will make you smile. Plus, they are super simple to make!

You will need:
1.5 heaped tablespoons of Piacha Black and Cherry loose leaf tea
130g plain flour
50g caster sugar
20g icing sugar
100g unsalted butter
splash of water
100g chocolate - optional

A straw for poking holes
Bakers twine (or other thread)

This will make: 16 teabag biscuits

Preheat your oven to:
200c or 180c (fan oven)

To make the biscuits:

    • First you need to grind up the tea leaves as small as you can - either in a food processor, with a pestle and mortar or like me in a bowl with the back of a spoon.
    • Now combine all your dry items (so that's the tea leaves, flour and both sugars) in a bowl, mixing them well
    • Next you need to add the butter - rub this into your dry ingredients so you end up with a bread crumb like mixture. Don't worry if it starts to combine together at this stage,
    • Now add a splash of water and carrying on combining the mixture to make a dough. At this stage less is definitely more - you don't want a sloppy dough
    • It's time to chill your mixture - this is important to stop the dough expanding when baking in the oven. Roll your dough out, wrap in cling film and put in the fridge for at least 30 minutes.
    • Once chilled, we get to the fun part - making the teabags! First put flour on your clean work surface, then roll out the dough until its about 0.5cm and then cut out your little teabag shapes. I used a straw to make the hole at the top of each teabag.
    Use a straw to poke holes in the top of your biscuits

    • Once you've cut all your teabags, place them onto a cold baking tray and place in your preheated oven for 12 minutes or until the edges of your biscuits turn a golden colour.
    • Remove your biscuits from the oven and allow to cool
    Tea bag biscuits in the making!

    • Once cool you can thread your twine through the holes in the top and dip your biscuits in melted chocolate. Don't forget if you go down the chocolate route you'll need to leave the biscuits to dry before you can tuck in.
    • Enjoy with a cup of tea!
    Teabag biscuits....perfect with a cup of tea!


    To be really honest these biscuits don't really need the chocolate dip - the light cherry flavour is sweet enough. However, if you do add the chocolate it doesn't ruin them either!

    These biscuits make a lovely gift for a tea loving friend.....or just gobble them all up yourself (like I did!).

    I'm sure this simple recipe will work well with other tea leaves, so if you don't have any Piacha tea at home why not experiment with your favourite tea - just remember to grind up your leaves! If you try a different tea yourself, we'd love to hear what you baked - leave us a comment or send us a photo!

    To find out more about Piacha teas and the fabulous tea bar in London pop by the Piacha website!

    Thank you for popping by today,
    Rachel

    Wednesday, 7 October 2015

    Recipe Time.....let's make fudge-ish!

    Hello there,

    Welcome back to Tea With Me and Friends, I hope you are well today!

    I thought I would share with you today a really, really simple recipe that I tried for the first time this weekend....perfect for making a sweet treat to accompany an afternoon tea spread. Yes, we are making fudge....now don't groan...because this is a cheats recipe! No need for fancy sugar thermometers or long recipes....in fact this recipe only has two ingredients! That's why I've called it "fudge-ish"....because I'm not entirely sure it is fudge.....however I have served my fudge-ish to unsuspecting guests this weekend and no one blinked an eye!

    Fudge-ish from Tea With Me and Friends

    It looks scrummy doesn't it....and no one needs to know that you didn't slave away over the hob to make it....I won't tell if you don't!

    So, I found a recipe a while ago on the Internet...on one of those tip/life hack sites, but I have tweaked the original recipe slightly...mainly because I didn't have enough of the ingredients in my kitchen....but it worked out well so I am sticking with these amounts.

    To make a batch of fudge-ish you will need:
    1 can of condensed milk - 397g (I used that well known variety but I'm sure an own brand would work just as well!)
    300g milk chocolate cut into small pieces (the smaller the better)
    1 shallow baking tray, well oiled to prevent sticking (this is very important)
    1 microwave
    space in your fridge to chill your fudge-ish

    Now...are you ready....to make the fudge-ish....

    • Put the condensed milk in a microwave save bowl, add the chocolate and stir well so all the chocolate is covered
    • Put your bowl in the microwave on high for approximately 2 minutes, remove and stir well. Don't worry if all the chocolate isn't melted to start with, as you stir it will all melt down and the mixture will start to thicken
    • Once you have a nice, thick mixture resist the urge to stick your finger in the bowl (however tempting) and instead pour it into your prepared baking tray. Smooth over the top with a spatula
    • Chill in the fridge for a couple of hours (the longer the better really), once set cut into small pieces to serve. Your fudge-ish is best served cold and it's definitely worth letting it chill properly in the first place otherwise you end up with a gooey mess that is hard to cut (yes, that's experience talking there!)
    A nice addition to an afternoon tea spread - a plate of homemade fudge

    You can either enjoy this plain - it has a slightly chocolately taste, and is rich and creamy. Or if you fancy something a little different, once the mixture is ready to chill add a little sea salt to the top and press down slightly into the mixture.

    If you want a more chocolately taste, simply add a bit more chocolate in the first place.

    I hope you enjoy this recipe - if you give it a go let me know how you get on! Send us a photo of your fudge-ish on Twitter or Facebook!

    Thank you for popping by today,
    Rachel 

    Sunday, 16 August 2015

    Time for....some Pistachio Macarons

    Hello there,

    Happy Sunday! We hope you are well and have enjoyed our week of afternoon tea news, reviews and recipes to celebrate Afternoon Tea Week 2015. Today we have one last recipe for you...this time from one of our lovely friends - Julie.

    Julie sent me this photo last week.....

    Pistachio Macarons - made by Julie

    My immediate reaction was....wow they look good! My second reaction was to ask Julie if we could share her photo on the blog....and whether we could also have the recipe!

    Luckily Julie agreed....so here we go....let's make some pistachio macarons....

    You will need...
    50g shelled unsalted pistachios
    200g cups icing sugar
    75g ground almonds
    120-125g egg whites (about 3 eggs)
    a pinch of salt
    40g caster sugar
    green food colouring paste

    Piping bag
    Baking trays

    Preheat the oven to 170c

    Just in case you forgot how good these look!

    How to make them....
    1. Use unsalted shelled pistachios, grind finely in a food processor, along with icing sugar and ground almonds until they are combined. Set aside.

    2. Tip the egg whites into a clean dry mixing bowl, add the salt, and using an electric whisk beat until they will only just hold a stiff peak. 

    3. Continue to whisk while adding the caster sugar a teaspoon at a time. Mix well between each spoonful to ensure the sugar is thoroughly incorporated before adding the next spoonful.  You should end up with a thick, white and glossy mixture.

    4. Now add the green food colouring, mixing thoroughly to ensure that the colour is evenly blended.

    5 Using a large metal spoon fold the ground sugar and almonds into the egg whites. 

    6. The mixture should be thoroughly mixed and smooth - once ready it should easily drop from your spoon. 

    7. Fill your piping bag with the mixture and pipe evenly sized rounds - about 5cm across - onto your prepared baking sheets. 

    8. Once finished, tap the bottom of the baking sheets sharply on your work surface (this removes any large air bubbles)

    9. Leave the macarons for between 15-60 minutes, until they have set and formed a dry shell. They should not be sticky when tested with your finger tips. 

    10. Bake the macarons on the middle shelf of the preheated oven one sheet at a time for 10 minutes. The tops should be crisp and the bottoms dry. 

    11. Leave to cool on the baking sheet. Once cool, the macarons can be filled - here Julie has used a White Chocolate Ganache, made with white chocolate and double cream.

    Pistachio Macarons
    Are you drooling yet?

    Don't they look wonderful?

    I'd like to send a HUGE thank you to Julie for sharing her photos and the recipe with us. If you give the recipe a go at home we'd love to see your macarons too - send us a photo!

    Thank you for popping by today,
    Rachel & Lorna

    Thursday, 13 August 2015

    Time for....some butter biscuits

    Hello there,

    Welcome back to Tea With Me and Friends....we're still celebrating Afternoon Tea Week 2015....and today we have some lovely butter biscuits for your afternoon tea stand. These biscuits are simple, buttery and taste wonderful with a little icing on them....which also makes them very pretty...

    Butter biscuits from
    Tea With Me and Friends

    The basic biscuit recipe is nice and easy.

    For a big batch of biscuits you will need....

    500g plain flour
    180g caster sugar
    250g cold butter
    2 large eggs

    What do you need to do....

    1. Preheat your oven to 170c
    2. First mix the flour and sugar together in a bowl, then add the butter. Use your fingertips to rub the butter into the flour and sugar - you should end up with something that looks like fine breadcrumbs.
    3. Once you've rubbed all the butter in, you need to add the egg to make a dough. You might need to add a splash of milk at this stage...make sure you don't add too much.
    4. Once you have a smooth dough, divide into two and make them into two flat discs. Cover and chill for thirty minutes before baking.
    5. Once you are ready to bake, roll the dough out and cut into your desired shapes.
    6. Bake your biscuits in the oven for 15 minutes, or until they are a golden colour.
    7. Once cool you can either enjoy with a cup of tea....or decorate!
    Seasonal biscuits - perfect for a Christmas afternoon tea stand

    These biscuits are sweet and buttery, and a little soft - they keep well when stored in a tin.

    I also used this recipe when I made my own version of a popular children's biscuit....


    These biscuits have been sandwiched with a little buttercream and jam....if you want to give them a touch of disco you could add a little icing and glitter too....


    All my iced biscuits are made using an icing made out of icing sugar and a little water....colour is also added if required for the design.

    What's your favourite type of biscuit? 
    Leave us a comment and let us know....

    Thank you for popping by today, we'll have another afternoon tea recipe for you tomorrow,
    Rachel & Lorna

    Wednesday, 12 August 2015

    Time for.....a spot of vanilla sponge

    Hello there,

    Welcome back to day three of Afternoon Tea Week 2015 at Tea With Me and Friends. We hope you have enjoyed the recipes that we've shared with you so far this week...today we decided to be a bit more traditional and look at a good old fashioned vanilla sponge.

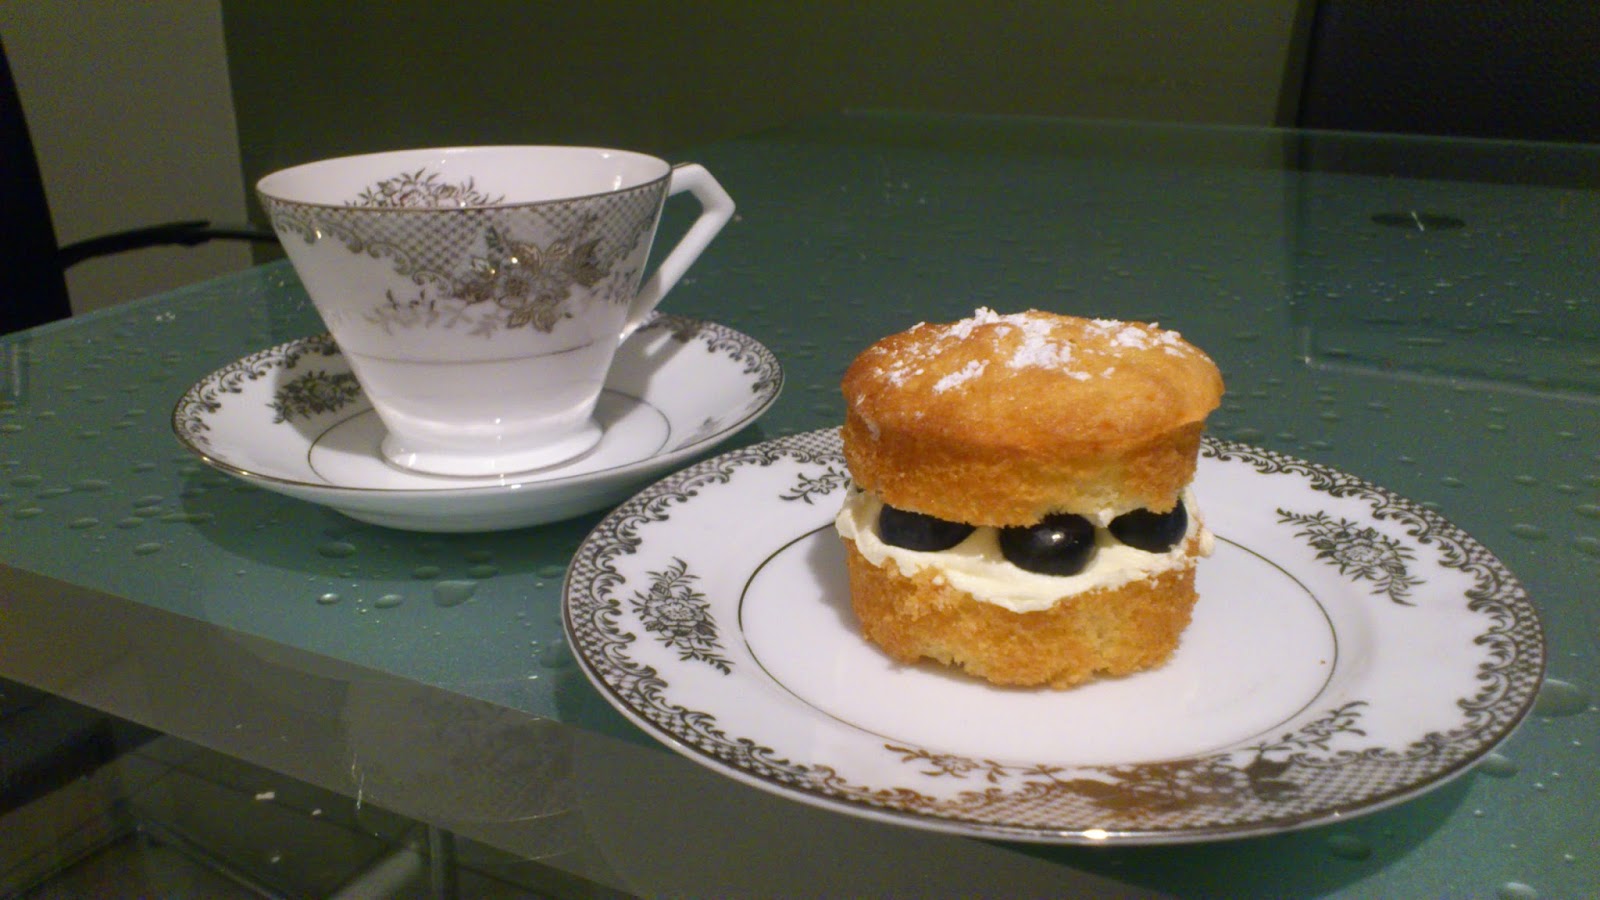
    Whether it be a vanilla cupcake or a Victoria Sponge, you can't really go well with a lovely vanilla sponge...especially when it looks like this....

    Mini Victoria Sponge
    Tea With Me and Friends

    Yes, this is a dinky little Victoria Sponge....perfect for an afternoon tea spread! I made my miniature sponges using the Mini Sandwich Tin from Lakeland, I also used the recipe from the Lakeland website.

    So, what will you need to make 12 mini sponges....

    175g unsalted butter, at room temperature
    175g caster sugar
    3 large eggs, beaten
    1 tsp vanilla extract
    175g self-raising flour
    Pinch of salt

    Not forgetting the buttercream...
    150g unsalted butter at room temperature
    300g icing sugar, sifted, plus extra for dusting

    Plus some jam of your choice....I've used strawberry here.

    So, what do you do....

    1. Preheat the oven to 180°C/350°F. Lightly grease the tin.
    2. Cream the butter and sugar together until the mixture is pale and fluffy. Gradually add the beaten eggs, mixing well between each addition and scraping down the sides of the bowl from time to time. Add the vanilla extract and mix again.
    3. Sift the flour and salt into the bowl and fold in until the mixture is glossy and smooth.
    4. Divide the mixture between the tin and level with a teaspoon.
    5. Bake on the middle shelf of the oven for about 15 minutes until golden, well risen and a wooden skewer inserted into the middle of one of the cakes comes out clean.
    6. Leave the cakes to cool in the tin for 2 minutes and then ease out onto a wire cooling rack and leave until completely cool.
    7. To make the buttercream, cream together the butter, icing sugar until the mixture is pale and fluffy. Transfer to a piping bag.
    8. Cut each cake in half, and pipe the buttercream onto the bases, in dots. Drizzle the jam over the buttercream dots, place the sponge tops on and lightly dust the cakes with icing sugar.
    Ta dah!

    Traditional mini Victoria Sponges

    A vanilla sponge is so versatile, as you can add all kinds of different fillings from preserves and curds to fresh berries....

    Mini Victoria Sponges with fresh blueberries

    Do you have the Lakeland Mini Sandwich Tin? What flavour cakes do you like to make in yours? We'd love to see your photos - send them to us on Twitter or post them to our Facebook page.

    Thank you for popping by today, we look forward to seeing you again soon.

    Rachel & Lorna

    Tuesday, 11 August 2015

    Time for.....Coconut and Passionfruit Slices

    Hello there,

    It's day two of Afternoon Tea Week 2015 and here at Tea With Me and Friends we've been baking again! Today we'd like to share a second afternoon tea recipe with you...this time something sweet for the top tier of your afternoon tea stand.

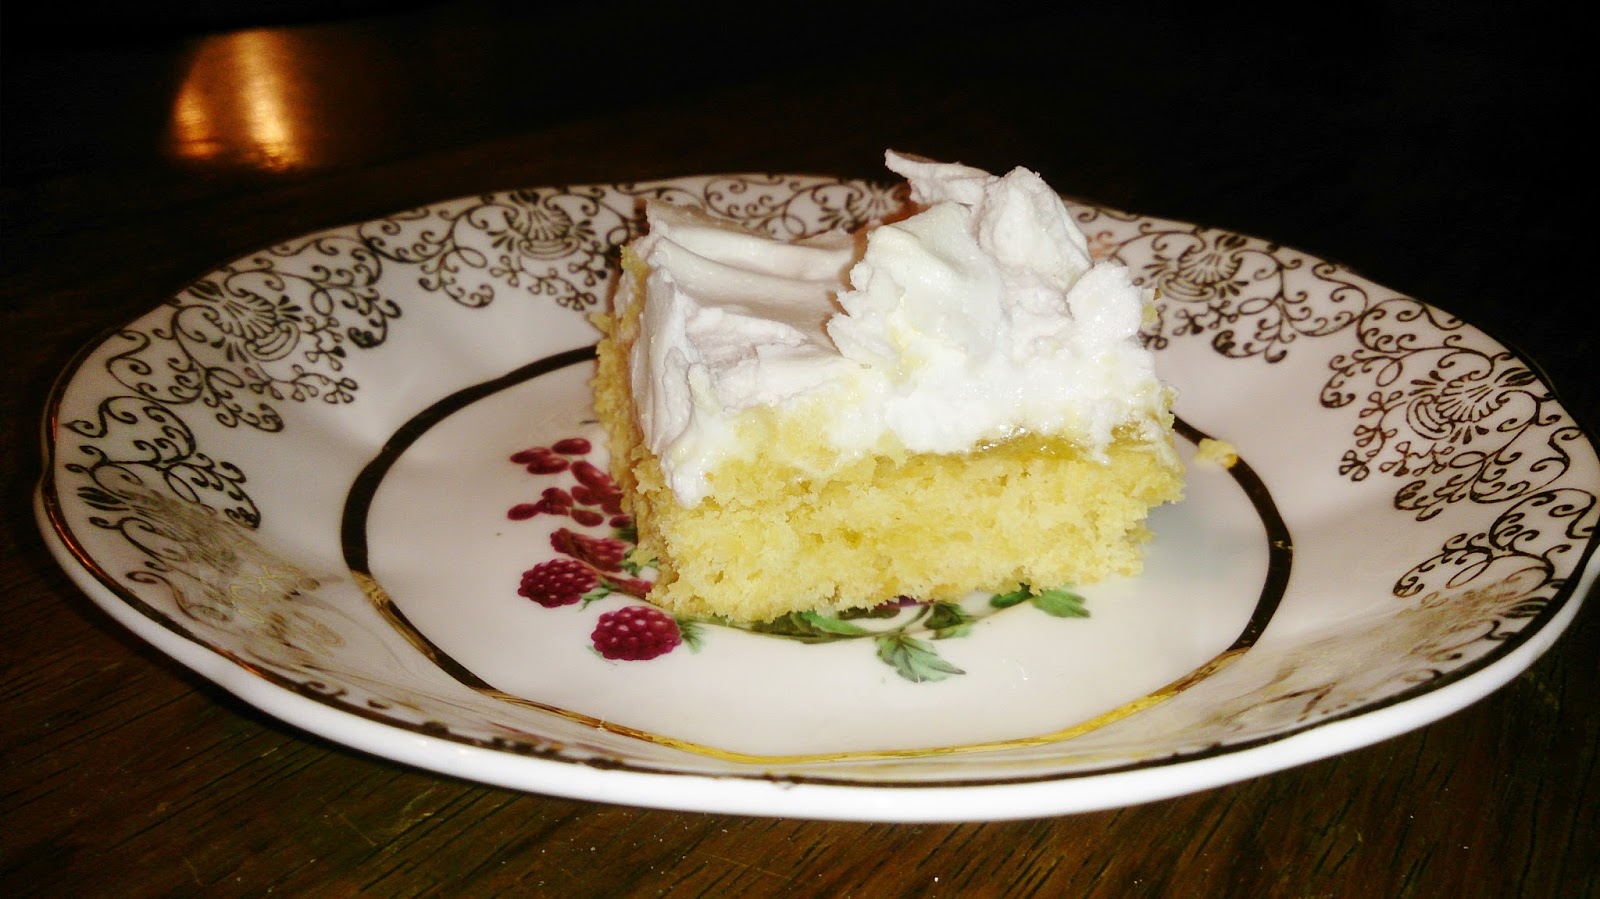
    This is a coconutty-buttery slice with a passion fruit curd, topped with a lovely crisp meringue......

    Afternoon tea cake - coconut and passion fruit slice


    You will need....
    150g softened butter
    70g caster sugar
    1 large egg yolk
    200g plain flour
    40g desiccated coconut
    6 tablespoons passion fruit curd
    2 large egg whites
    115g caster sugar

    So let's get started....

    1. Preheat the oven to 180c and grease a 23cm shallow square tin
    2. Beat the butter and sugar together in a bowl until light and fluffy, beat in the egg yolk and sift in the flour. Finally mix in the desiccated coconut and form into a soft dough.
    3. Press the dough into the prepared tin, prick all over with a fork and bake for 25-30 minutes or until a pale golden colour.
    4. Now to make the topping - whisk the two egg whites in a bowl until they hold stiff peaks. Then slowly add in your sugar....don't be tempted to rush here! You should end up with a lovely glossy meringue.
    5. Once your base is baked, take it out of the oven and spread the passion fruit curd over the whole base. Then spoon the meringue on top of the curd, make sure you cover the whole base.
    6. Then back in the oven for another 15-20 minutes or until the meringue is crisp and golden.
    7. Leave to cool in the tin....then cut into little squares....and devour! Perfect with a cup of tea!
    Afternoon tea sweets from Tea With Me and Friends

    This is similar to a more traditional coconut and raspberry jam square...but I fancied something a little more tropical with my coconut. Usually you would have a shortbread base, topped with raspberry jam with a coconut meringue on top. As you can see I have moved the coconut around a little in my recipe and swapped the traditional jam for an more exotic passion fruit curd.


    Several people (including Lorna) have enjoyed a slice of this cake and have given me great feedback.....if you have a go at making these sweet treats we'd love to hear how it went. Send us a photo on Twitter or leave a comment over on our Facebook page!


    Thank you for popping by today and pop back tomorrow for another afternoon tea recipe!

    Rachel

    Monday, 10 August 2015

    Time for......Blueberry and Lemon Curd Scones

    Hello there,

    Welcome back to Tea With Me and Friends, as we are celebrating Afternoon Tea Week 2015, we have decided to try some afternoon tea recipes....and what better way to start then with some scones.

    Now, we've made scones on the blog before, but they have always been of the plain or fruited variety. Today we are sharing something a little bit different....Lemon and Blueberry scones. This recipe comes from The English Provender Co and uses their lemon curd to flavour the scones.

    The recipe is nice and simple to follow and will make you a batch of about ten scones.....unless (like me) you use a cutter which is too large....then you'll get eight!

    Good to know:
    Makes: about 10
    Preparation time: 5 minutes
    Cooking time: 12 minutes

    What you need:
    300 g self- raising flour
    1 teaspoon baking powder
    75 g butter, cut into small squares
    50 g caster sugar
    100 g blueberries
    3 tablespoons The English Provender Co. Luxury Lemon Curd
    150 ml milk, plus extra for brushing

    Don't forget....
    Clotted cream
    The English Provender Co. Luxury Lemon Curd

    So, let's get started....
    1. Preheat the oven to 200°C, Gas Mark 6. Sift the flour and baking powder into a bowl then rub in the butter, until the mixture looks like fine breadcrumbs.

    Top Tip - make sure the butter comes straight from the fridge so it's really, really cold....this will produce better scones.


    2. Stir in the sugar and blueberries and mix well. Whisk together the milk and lemon curd and gently stir into the breadcrumb mixture, until the mixture is a soft dough and comes together in a ball.


    3. Gently knead on a lightly floured surface to remove any cracks. Roll out to 2 cm thickness, then using a 6 cm fluted pastry cutter, cut into rounds. Gather up any spare bits of dough and knead lightly, roll out and make more scones

    Top Tip - when cutting the scones, don't press the cutter all the way down as this will "seal" your scones around the edges and make it harder for them to rise.


    4. Place on a baking tray, spacing them a little apart, brush the tops with milk and cook for 10-12 minutes, until risen and golden brown. Transfer to a cooling rack.....no touching just yet....let them cool a little!


    5. And finally.....serve! Best served warm (or that's my preference anyway) with clotted cream and more of the scrummy lemon curd.


    See, I told you it was an easy to follow recipe! 

    I really enjoyed these scones, they have a light lemony-fruity flavour which goes great with the cream and curd but can also be enjoyed with just butter. My scones didn't rise as well as they should have...but I think this because I was a little heavy handed with the dough.

    Another Top Tip - don't handle the dough too much and try and work quickly to stop the butter from warming too much.

    I'd like to thank The English Provender Co for sharing this scrummy recipe with us. If you have a go at making these scones at home we'd love to see the results....send us a photo on Twitter or on our Facebook page!

    Thank you for popping by today, pop back tomorrow for another scrummy afternoon tea recipe!

    Rachel & Lorna

    Saturday, 8 February 2014

    Top Tips for Scone Baking!

    Hello there!

    Here at Tea With Me and Friends Lorna is the scone maker and she is really good at it (I’ve tried and failed miserably…I’m much better at eating them!). She has a recipe that we shared with you last year and her scones are always scrummy. Being such an awful scone baker myself I decided it was about time I did a little research on the subject......before hitting the kitchen again.

    There is an awful lot of recommendations on the Internet, I learnt a lot during my research....so much that I decided to share it with you.....

    So, apparently there are some key things that I need to remember when baking scones! Firstly....butter makes your scones light and fluffy. Too little butter and you will end up with dry and heavy scones (aka “stodgy”). So it’s really important to have the correct flour/butter ratio (follow your recipe and measure everything out!). It’s also really important that your butter is cold when you use it…..again this helps with fluffiness!

    Are you ready for the science bit?

    Butter forms small pockets throughout your dough, as it melts it is replaced by the carbon dioxide from your raising agent...allowing your scones to rise. If your butter melts or softens before you start baking your scones, the carbon dioxide has nowhere to go and therefore escapes from your dough….resulting in flat, hard scones. Just like my last attempt......

    Hmmm....flat scones are never good!!

    The way you cut your scones is also important, when you use your cutter or knife don’t cut all the way through the dough. Press about three-quarters of the way through and then tear the rest. It sounds a bit weird, but if you press the cutters all the way down, you seal the sides of your scones….and this hampers the rising!

    The final piece of advice is to handle the dough as little as possible. You don’t want gluten to develop in your dough and remember.....you want the butter to stay cold before baking – so stop touching the dough!

    Now as I read through the pages of advice and various articles my various failed batches of scones flashed before my eyes. A slightly depressing experience considering I love baking! So armed with all these tips and Lorna’s favourite scone recipe I headed back to the kitchen!

    (An hour or so later……)

    Well, what do you know....the advice helped! I have to say I was quite pleased when I opened the oven door and saw these beauties....

    Thats much better - a light and fluffy scone!

    Plus they taste wonderful and were light and fluffy too…everything that a good scone is supposed to be! And they definitely rose! If you fancy doing a little science in the kitchen, get your apron on and whip up a batch of scones following these tips!

    I hope you are as successful as me….or maybe you already knew all this….

    Thanks for popping by today,
    Rachel

    Monday, 3 February 2014

    The votings over....but which sandwich filling won?

    Hello there,

    Well, yesterday our latest poll closed...thank you to everyone who voted and joined in our various chats on Twitter and Facebook all about sandwich fillings!

    We gave you quite a traditional choice of afternoon tea sandwich fillings to pick from....there was egg mayonnaise, cucumber, salmon, coronation chicken, ham or the option to pick "other". The firm favourite was egg mayonnaise with 32% of the votes, this was closely followed by cucumber at 24% and my personal favourite coronation chicken with 20% of the votes.


    Afternoon tea sandwiches

    So, how do you make a good egg mayonnaise sandwich...I'm by no means perfect, but this is what I do....

    You will need:

    1. Two slices of white bread, buttered with the crusts cut off 
    2. One large egg
    3. A dollop of mayonnaise (I prefer full fat Heinz mayo, but you may have another favourite brand!)
    4. Seasoning (if you must)
    So, I said it....white bread....yes, its not the most healthy variety (and I prefer full fat mayo for this sandwich!)...but if I'm honest I will always pick white bread for my egg sandwiches....it just tastes better!

    What to do:
    1. You first need to boil your egg, I prefer a hard boiled egg for my sandwiches, but I know this will vary person to person so why not experiment with your boiling! 
    2. Once boiled, I peel the egg and leave it to cool (nothing worse than a hot egg mayonnaise sandwich!).
    3. Once cooled I mash my egg with a fork and then add a good dollop of mayonnaise. Now mix well. At this stage please add seasoning to taste, you could also add some chopped chives or a handful of cress if you fancy something a little bit different.
    4. You then need to top one piece of bread with your egg mixture, making sure you have egg from one side of the bread to the other (don't miss any bit out!). Once you are happy with your coverage, add the top slice of bread and press down (not too firmly or your filling will ooze from the sides!). 
    5. Now take a sharp knife and cut your sandwich into delicate fingers and enjoy!
    More afternoon tea sandwiches

    I hope you've enjoyed our recent poll - I've definitely enjoyed hearing about everyones favourite sandwiches. 

    Watch out for a new poll coming soon!

    Thanks for popping by today,
    Rachel